


This should fix TRLOD and any power on and off issues
Sept 26, 2023 12:21:50 GMT
spannernick and dipovlado like this
Post by spannernick on Sept 26, 2023 12:21:50 GMT
This should fix TRLOD(The Red Light Of Death) the power on for 10 seconds then off issues so you might hear the music from the boot screen for 1 second and then the screen flashes then it turns itself off in 5 or 10 seconds in all, you might be getting this when you turn on THEA500 Mini, it can happen if you run a mod in the carousel via its USB Menu and when the carousel does not load properly for some reason.
If you are using a mod like PCUAE,AMM,AGS,PANDORY then you should flash this on your THEA500 Mini, it will keep it working, its highly recommended, TRLOD has been added to stop you modifying THEA500 Mini and the carousel in anyway.
About The Red Light Of Death on THEA500 Mini
==================================
Basically there's a key (the SoC backup key) programmed in the CPU/SoC by RGL. The Carousel checks if this key is correct and if not then power off. Apparently for some reason this key can be overwritten with 0's and then if a special bit (aka efuse) is permanently set in the CPU/SoC that ensures you can't re-write the key again to the one that is expected. I'm not sure what causes it, whether it is by accident or a 'anti tamper measure' by RGL(more likely).
The fix is a modified kernel that doesn't read the actual key in combination with a tool that sets the correct key in the kernel's memory so that when the Carousel checks it the right key is returned.
As I do this in nanda it will most likely not be affected by RGL updates because (statistically speaking) RGL doesn't update the nanda in their firmware updates.
Obviously they could start checking a checksum of nanda and detect that it is different from the standard one but I don't think that will happen.
RGL will never replace it if THEA500 Mini does this because they think you have tampered with it, so I would do this even if your THEA500 Mini is working fine, I have and have never had a problem with it not booting, I have never had to buy another one, I have the same model I got when I pre-ordered it in 2021 so it does show it does work, it would not hurt THEA500 Mini in anyway if you did this, it would future prove it so it always works and continues to do so.
If THEA500 Mini has a hardware problem then this may not fix it, its properly down to its Power Management Unit IC (PMC IC) Clone A8038 IC, its not the same IC as on the OPI3 board, properly the manufacture changed it with a cheaper chip to lower costs, they did the same thing with THEC64 Maxi, THEC64 Mini is the only one that uses the same IC as its development board its based on A20-OLinuXino-LIME2:
www.olimex.com/Products/OLinuXino/A20/A20-OLinuXino-LIME2/open-source-hardware
***NO Soldering is required to do this now***
You can use the OTG virtual serial port now...
You will need a USB A to A Cable only and a PC with Windows 10 or 11 on it, I am using Windows 11.
You will need to take THEA500 Mini apart to get to the FEL Mode button on THEA500 Mini PCB Board.
THEA500 TRLOD: Power on then off Power Problem THEA500 Mini
What you will need.
1. A USB A to A Cable - its a USB Cable that have both the same ends, like this:

2. FEL Mode for THEA500 Mini - This allows you to connect to THEA500 Mini from your PC, Download below.
3. A USB Stick - Does not have to be big stick, the files are only about 200mb it needs, it will depends on if you want to flash the firmware too or not, the firmware is 184mb, the kernal is 12.1mb.
Make sure you scan the USB Stick before doing this if it asks to be scanned for errors in the PC, that if your have used it in THEA500 Mini before, THEA500 Mini always marks the USB Stick and says it has errors on it when it does not, but it might have a problem reading the USB Stick in THEA500 FEL Mode if it has the mark on it or if you have used it in THEA500 Mini before.
THEA500 Mini marks it because it does not eject it properly and does not shutdown properly, it in standby mode when you shut it down, its like a Android box, they go on to standby mode(box standby) so you can turn them on again with the remote, it called box standby so when you plug the power in to THEA500 Mini it goes straight to box standby waiting for the power button to be pressed, it mean it partly powered like your TV is if its on Standby with the red light on, THEC64 does the same thing too, but THEC64 Mini powers on itself and boots when you plug the power cable in but when you shut it down it goes to box standby too, and it probably because the kernal is a Android Kernel, because the box standby is part of the Android kernal, its really a Android Box that has been modified to run Linux Arm50i, you can get Android Boxes with a Allwinner H6 in them, all RGL machines work the same way, just some info on why it has errors on the USB Stick after you plug it into THEA500 Mini.
Thanks goes to jj0 and oleavr for all of this...
You need to use THEA500 FEL Mode to open a terminal on THEA500 Mini OTG virtual serial port ttyGS0 OTG Mode, Gadget Mode, THEA500 Mini has a Android kernal like THEC64 does and will need a USB A to A Cable and it plugged into the USB port next to the HDMI port and the other end plugged it to a USB port on your PC, not into a USB Hub but a USB port on your PC.
Video is here to help... It will show how to use FEL Mode on THEA500 Mini and how to Flash the modified nanda to THEA500 Mini...
USE THIS AT YOUR OWN RISK:
To run the FEL-mode rescue boot:
Picture of FEL mode button position

Once you've done one of these, your PC should have a new USB device (1f3a:efe8, on my Ubuntu PC it's called an '1f3a:efe8 Allwinner Technology sunxi SoC OTG connector in FEL/flashing mode).
Next:
If all works well you will see that the various files are being uploaded, this takes about a minute:
To quit the OTG mode you can just switch off THEA500 Mini.
You will need Putty to connect THEA500 Mini to your PC so you can see its terminal screen, you will need to download the version for your Windows(Win10 or 11)your using, download it from here:
www.chiark.greenend.org.uk/~sgtatham/putty/latest.html
You should now see the Greed LED light on THEA500 Mini, now its ready for you to connect to its OTG virtual Com port.
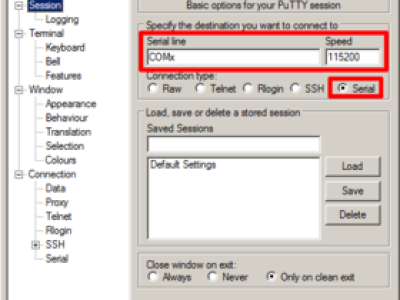
Once you have installed it then open the Putty program, so find it and click on its exe file, then first select Connection Type Serial and then you will be using Serial Line.
Now..
The COM port of the OTG virtual serial port (COM1, COM2, .... COM9) and Speed 115200. Under "Devices and Printers" you can see what COM port number the OTG virtual serial port is using, you can look in Device Manger too on Windows 10(Right click on Start Menu and go up to Device Manager and click on it) to see what COM port the OTG virtual serial port is using too, its under Ports (COM & LPT).
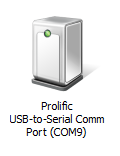
In my case it is port COM8 and its called USB Serial Device (COM8).
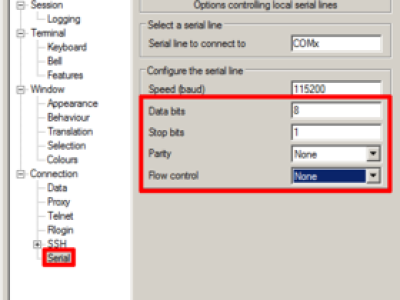
Next you go down to Serial.
Enter the data there. it should already say Serial Line and Speed.
Speed = 115200
Data Bits = 8
Stop Bits = 1
Parity = None
Flow Control = None
To overwrite the nanda with modified kernal nanda thats stops the key check and can make some THEA500 Mini useless.
-----------------------------------------------------------------------------------------------------------------------------------------
Download the nanda and nandb files for THEA500 Mini here
You need to put the 2 files on the root of the USB Drive first so extract them on to the USB Drive.
so you should have:
Once done put USB Drive in the one of the spare USB Ports in THEA500 Mini and then start THEA500 Mini FEL Mode like above and Putty setup too and are connected to THEA500 Mini and you can see its terminal screen.
This:

Make sure the USB Drive is mounted at /mnt.
Do this:
type:
if its not mounted already.
To write to nanda and nandb you first have to load the nand driver.
Do this:
type:
To overwrite nanda the Kernel
-----------------------------------
This will fix the power problem where you turn THEA500 Mini on and then 5 seconds later it turns itself off.
Writing back e.g. nanda:
Wait for it to finish
then type:
(Do not turn off THEA500 Mini if you plan on doing the next part and writing over nandb)
then turn off THEA500 by unplugging it then turn it back on and it should then boot the new kernel up and then the carousel should boot up fine.
If you still have a problem and it still not booting try to flash the nandb in the next step, it might fix it then.
To overwrite nandb Firmware so its on v1.0.0
-----------------------------------------------------
You only need to do this if you want to downgrade from v1.1.1 or there something wrong with the firmware so cleaning it.
Writing back e.g. nandb:
Do not need to do `cd /mnt` if you did it already with writing nanda above.
then type:
then turn off THEA500 by unplugging it then turn it back on and check in the carousel menu(Advanced Settings) if its on manhattan v1.0.0.
and thats it... hope it working OK for you now....
Please post if its worked for you now or any problems your having and I will try and help you.
Enjoy playing your new THEA500 Mini...
If you are using a mod like PCUAE,AMM,AGS,PANDORY then you should flash this on your THEA500 Mini, it will keep it working, its highly recommended, TRLOD has been added to stop you modifying THEA500 Mini and the carousel in anyway.
About The Red Light Of Death on THEA500 Mini
==================================
Basically there's a key (the SoC backup key) programmed in the CPU/SoC by RGL. The Carousel checks if this key is correct and if not then power off. Apparently for some reason this key can be overwritten with 0's and then if a special bit (aka efuse) is permanently set in the CPU/SoC that ensures you can't re-write the key again to the one that is expected. I'm not sure what causes it, whether it is by accident or a 'anti tamper measure' by RGL(more likely).
The fix is a modified kernel that doesn't read the actual key in combination with a tool that sets the correct key in the kernel's memory so that when the Carousel checks it the right key is returned.
As I do this in nanda it will most likely not be affected by RGL updates because (statistically speaking) RGL doesn't update the nanda in their firmware updates.
Obviously they could start checking a checksum of nanda and detect that it is different from the standard one but I don't think that will happen.
RGL will never replace it if THEA500 Mini does this because they think you have tampered with it, so I would do this even if your THEA500 Mini is working fine, I have and have never had a problem with it not booting, I have never had to buy another one, I have the same model I got when I pre-ordered it in 2021 so it does show it does work, it would not hurt THEA500 Mini in anyway if you did this, it would future prove it so it always works and continues to do so.
www.olimex.com/Products/OLinuXino/A20/A20-OLinuXino-LIME2/open-source-hardware
***NO Soldering is required to do this now***
You can use the OTG virtual serial port now...
You will need a USB A to A Cable only and a PC with Windows 10 or 11 on it, I am using Windows 11.
You will need to take THEA500 Mini apart to get to the FEL Mode button on THEA500 Mini PCB Board.
THEA500 TRLOD: Power on then off Power Problem THEA500 Mini
What you will need.
1. A USB A to A Cable - its a USB Cable that have both the same ends, like this:

2. FEL Mode for THEA500 Mini - This allows you to connect to THEA500 Mini from your PC, Download below.
3. A USB Stick - Does not have to be big stick, the files are only about 200mb it needs, it will depends on if you want to flash the firmware too or not, the firmware is 184mb, the kernal is 12.1mb.
Make sure you scan the USB Stick before doing this if it asks to be scanned for errors in the PC, that if your have used it in THEA500 Mini before, THEA500 Mini always marks the USB Stick and says it has errors on it when it does not, but it might have a problem reading the USB Stick in THEA500 FEL Mode if it has the mark on it or if you have used it in THEA500 Mini before.
THEA500 Mini marks it because it does not eject it properly and does not shutdown properly, it in standby mode when you shut it down, its like a Android box, they go on to standby mode(box standby) so you can turn them on again with the remote, it called box standby so when you plug the power in to THEA500 Mini it goes straight to box standby waiting for the power button to be pressed, it mean it partly powered like your TV is if its on Standby with the red light on, THEC64 does the same thing too, but THEC64 Mini powers on itself and boots when you plug the power cable in but when you shut it down it goes to box standby too, and it probably because the kernal is a Android Kernel, because the box standby is part of the Android kernal, its really a Android Box that has been modified to run Linux Arm50i, you can get Android Boxes with a Allwinner H6 in them, all RGL machines work the same way, just some info on why it has errors on the USB Stick after you plug it into THEA500 Mini.
Thanks goes to jj0 and oleavr for all of this...

You need to use THEA500 FEL Mode to open a terminal on THEA500 Mini OTG virtual serial port ttyGS0 OTG Mode, Gadget Mode, THEA500 Mini has a Android kernal like THEC64 does and will need a USB A to A Cable and it plugged into the USB port next to the HDMI port and the other end plugged it to a USB port on your PC, not into a USB Hub but a USB port on your PC.
Video is here to help... It will show how to use FEL Mode on THEA500 Mini and how to Flash the modified nanda to THEA500 Mini...
The required files for FEL Mode for THEA500 Mini can be found in this A500-FEL-rescue-boot-v3.7z file or there is a mirror of the file here. If you extract the contents of the file to a directory on your PC you will have the following folders:
- boot: This contains the required uboot, kernel, dtb etc files
- linux: sunxi-fel tool for linux (x86_64) and boot.sh to upload the kernel etc to the Maxi. If the tools don't work you might need to install them yourself (apt-get install sunxi-tools) or compile them from source.
- windows: sunxi-fel tool Windows (64-bit) and boot.sh to upload the kernel etc to THEA500 Mini.
USE THIS AT YOUR OWN RISK:
- I've tested in on my THEA500 Mini without issues but your results might vary
- Take care to ensure your THEA500 Mini has enough power, preferably don't just run it from your PC's USB port but power it via its USB-C power connector too.
To run the FEL-mode rescue boot:
- You will need to open up THEA500 Mini first so you can get to its FEL-mode button on its main board, the screws are under its rubber feet and one under its label, if you turn it over so use a Stanley Knife to remove the feet and to pull up the label to get to its screw under it, you can do it without damaging the label
- Extract the zipfile to a directory on your PC
- Connect THEA500 Mini from the USB A port next to the HDMI connector to a USB (also A) port on your PC, You will need a USB A to A Cable.
- Switch on the THEA500 and verify that it works and receives enough power from your PC and via the USB-C power port
- Power it off again and make it boot in FEL mode by opening up your THEA500, keeping the FEL-mode button pressed and then powering THEA500 on, The FEL-mode button is the tiny button on the top right hand side of THEA500 PCB in the picture below:
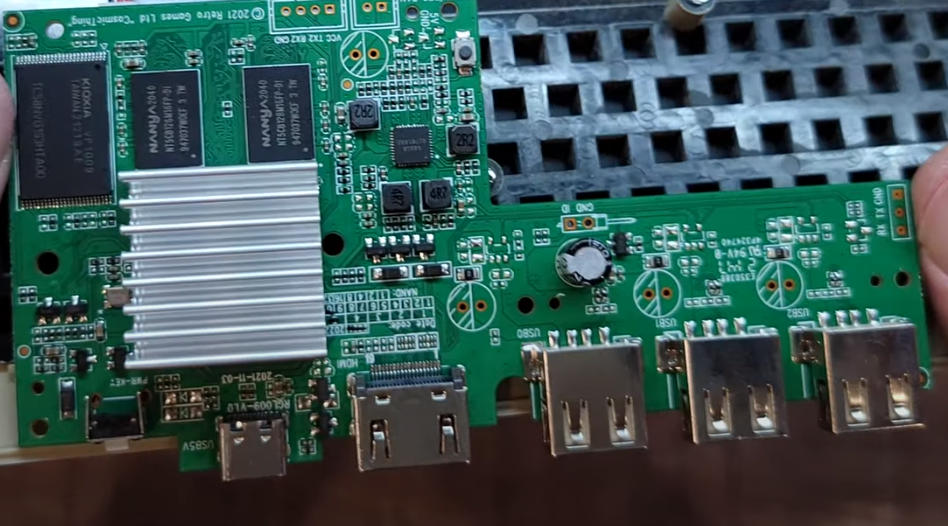
- Make sure that the USB A to A Cable is plugged in to the USB port next to the HDMI and in the PC and the power cable is in before you do this and it getting the right power. You might be able to press the FEL Mode button without remove THEA500 Mini PCB, its here in the picture below marked with a square red box, it right next to the screw pole, you might be able to press it with your finger, just tested it and yes you can and hold it down too with your finger, if not use a flat piece of plastic so you can press and hold it down and the power button for about 5 seconds then it should be in FEL Mode, you should hear the PC make a donk sound like you have plugged in a device in to it, thats if you have your PC speakers turned on, you hear it in the video.
Picture of FEL mode button position

Once you've done one of these, your PC should have a new USB device (1f3a:efe8, on my Ubuntu PC it's called an '1f3a:efe8 Allwinner Technology sunxi SoC OTG connector in FEL/flashing mode).
Next:
- If you're using Windows 7 or 10 (64 bit) cd to the windows folder and run boot.cmd. You might need to install a USB driver. But if you have hackchi2 installed the USB driver might already be installed. It might call your THEA500 differently though, e.g. SNES.
You might see a new device in Device Manager under Universal Serial Bus Device called: Unknown Device #1, if it has drivers already then its ok, if not then install the one above for Windows 10/11 if you using one of them OSes.
If all works well you will see that the various files are being uploaded, this takes about a minute:
USB device 001:012   Allwinner H6      82c00007:8c004708:01421d58:206f20d1
found DT name in SPL header: sun50i-h6-orangepi-3
Stack pointers: sp_irq=0x00022000, sp=0x00025E08
MMU is not enabled by BROM
=> Executing the SPL... done.
loading image "ARM Trusted Firmware" (41073 bytes) to 0x104000
loading image "SCP firmware" (1024 bytes) to 0x114000
loading image "U-Boot (64-bit)" (671216 bytes) to 0x4a000000
loading DTB "sun50i-h6-orangepi-3" (32960 bytes)
100% [================================================] 15440 kB,  256.0 kB/s
100% [================================================]   254 kB,  255.9 kB/s
100% [================================================]     0 kB,  155.0 kB/s
Passing boot info via sunxi SPL: script address = 0x43100000, uEnv length = 240
Starting U-Boot (0x00104000).
Store entry point 0x00104000 to RVBAR 0x09010040, and request warm reset with RMR mode 3... done.
- Once finished your PC should have a new (virtual) serial port.
On Windows a COMx port, look in Device Manager to check it.
On THEA500 itself it is /dev/ttyGS0. Note you might need to install the USB CDC driver if you're not on Windows 10.
You can connect to this serial port with e.g. screen or tio in Linux, or Putty in Windows with parameters 115200,N,8,1. Once you connect you can start using the shell straight away without having to log in.
To quit the OTG mode you can just switch off THEA500 Mini.
You will need Putty to connect THEA500 Mini to your PC so you can see its terminal screen, you will need to download the version for your Windows(Win10 or 11)your using, download it from here:
www.chiark.greenend.org.uk/~sgtatham/putty/latest.html
You should now see the Greed LED light on THEA500 Mini, now its ready for you to connect to its OTG virtual Com port.
Once you have installed it then open the Putty program, so find it and click on its exe file, then first select Connection Type Serial and then you will be using Serial Line.
Now..
The COM port of the OTG virtual serial port (COM1, COM2, .... COM9) and Speed 115200. Under "Devices and Printers" you can see what COM port number the OTG virtual serial port is using, you can look in Device Manger too on Windows 10(Right click on Start Menu and go up to Device Manager and click on it) to see what COM port the OTG virtual serial port is using too, its under Ports (COM & LPT).
In my case it is port COM8 and its called USB Serial Device (COM8).
Next you go down to Serial.
Enter the data there. it should already say Serial Line and Speed.
Speed = 115200
Data Bits = 8
Stop Bits = 1
Parity = None
Flow Control = None
To overwrite the nanda with modified kernal nanda thats stops the key check and can make some THEA500 Mini useless.
-----------------------------------------------------------------------------------------------------------------------------------------
Download the nanda and nandb files for THEA500 Mini here
You need to put the 2 files on the root of the USB Drive first so extract them on to the USB Drive.
so you should have:
nanda-jj0-v10-remove-no-tamper.imgnandb-span-v1.0.0-firmware.imgOnce done put USB Drive in the one of the spare USB Ports in THEA500 Mini and then start THEA500 Mini FEL Mode like above and Putty setup too and are connected to THEA500 Mini and you can see its terminal screen.
This:

Make sure the USB Drive is mounted at /mnt.
Do this:
type:
mount /dev/sda1 /mnt

mount -o remount,rw /mnt
if its not mounted already.
To write to nanda and nandb you first have to load the nand driver.
Do this:
type:
insmod /lib/modules/3.10.65/nand.koTo overwrite nanda the Kernel
-----------------------------------
This will fix the power problem where you turn THEA500 Mini on and then 5 seconds later it turns itself off.
Writing back e.g. nanda:
cd /mnt

dd if=nanda-jj0-v10-remove-no-tamper.img of=/dev/nanda
Wait for it to finish
then type:
sync(Do not turn off THEA500 Mini if you plan on doing the next part and writing over nandb)
then turn off THEA500 by unplugging it then turn it back on and it should then boot the new kernel up and then the carousel should boot up fine.
If you still have a problem and it still not booting try to flash the nandb in the next step, it might fix it then.
To overwrite nandb Firmware so its on v1.0.0
-----------------------------------------------------
You only need to do this if you want to downgrade from v1.1.1 or there something wrong with the firmware so cleaning it.
Writing back e.g. nandb:
Do not need to do `cd /mnt` if you did it already with writing nanda above.
cd /mnt

dd if=nandb-span-v1.0.0-firmware.img of=/dev/nandb
then type:
syncthen turn off THEA500 by unplugging it then turn it back on and check in the carousel menu(Advanced Settings) if its on manhattan v1.0.0.
and thats it...
hope it working OK for you now.... Please post if its worked for you now or any problems your having and I will try and help you.
Enjoy playing your new THEA500 Mini...


